# Manual for Maintenance Management Portal

## **1** Service Provider Portal

### 1.1 Function Overview <a href="#toc26390" id="toc26390"></a>

Wizarpos service provider portal, mainly provides functions for service providers to manage merchants. It allows adding and modifying one or more merchants under this service provider. The merchant types supported are retail and catering. It is possible to view the transaction records of each merchant, as well as the terminal information and quantity bound to each merchant.
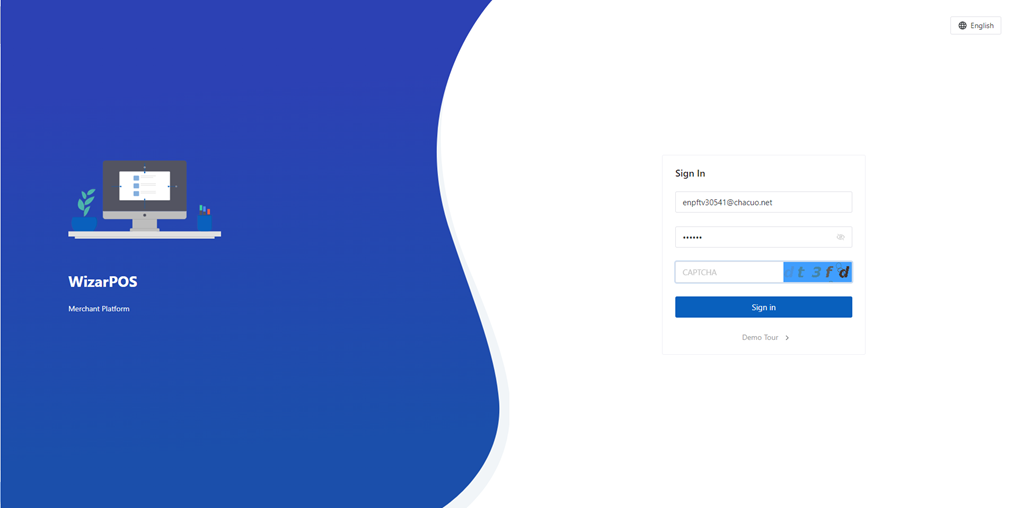
### 1.2 Login <a href="#toc5715" id="toc5715"></a>

Enter the account password to log in to the backend. Before logging in, you can choose the language

![](https://1012038583-files.gitbook.io/~/files/v0/b/gitbook-x-prod.appspot.com/o/spaces%2F6WUxwQSQcDz5p25hG7s0%2Fuploads%2FWBBBWfKV1Jx9n5VmhB6b%2F0.png?alt=media)

### 1.3 Merchant Management - Settlement Records <a href="#toc16686" id="toc16686"></a>

Click on Settlement Results to access the settlement records, where you can view the transaction data of all merchants under this service provider, including member transactions and bank card transactions

![](https://1012038583-files.gitbook.io/~/files/v0/b/gitbook-x-prod.appspot.com/o/spaces%2F6WUxwQSQcDz5p25hG7s0%2Fuploads%2FTAvrkLP2Qt1jRUVjLIs2%2F1.png?alt=media)

### &#x20;<a href="#toc24981" id="toc24981"></a>

### 1.4 Merchant Management - Merchant Information Management

Click on MerchantList to enter the merchant list, where you can add new merchants (retail or catering), search and edit merchant information, configure payment methods, set payment parameters, resend emails, view bound terminals, enable merchants, disable merchants, etc

![](https://1012038583-files.gitbook.io/~/files/v0/b/gitbook-x-prod.appspot.com/o/spaces%2F6WUxwQSQcDz5p25hG7s0%2Fuploads%2FHDEjBTUxke8IWyYMAm1p%2F2.png?alt=media)

Click "Add Merchant" to add a new merchant. After filling in the merchant information, complete the account opening process. The merchant will receive an account opening email and can log in to the merchant portal using the initial account and password to perform operations

![](https://1012038583-files.gitbook.io/~/files/v0/b/gitbook-x-prod.appspot.com/o/spaces%2F6WUxwQSQcDz5p25hG7s0%2Fuploads%2FyTATeVI9hHFAlZxh0UQP%2F3.png?alt=media)

Clicking on "more" allows you to configure payments, edit merchants, and manage terminals

![](https://1012038583-files.gitbook.io/~/files/v0/b/gitbook-x-prod.appspot.com/o/spaces%2F6WUxwQSQcDz5p25hG7s0%2Fuploads%2FJQtZKDGQpDjOYxstUqME%2F4.png?alt=media)

Terminal Management Click on Payment Setting to configure the existing payment methods, whether to enable or disable online and offline

![](https://1012038583-files.gitbook.io/~/files/v0/b/gitbook-x-prod.appspot.com/o/spaces%2F6WUxwQSQcDz5p25hG7s0%2Fuploads%2FhsuGBdTp8gzU9RTRU37M%2F5.png?alt=media)

Clicking on Payment Setting allows you to configure payment parameters according to the actual payment integration needs. After configuration, you can proceed with actual payment transactions

![](https://1012038583-files.gitbook.io/~/files/v0/b/gitbook-x-prod.appspot.com/o/spaces%2F6WUxwQSQcDz5p25hG7s0%2Fuploads%2FCvPCNegGqSqjxNkkgWvn%2F6.png?alt=media)

You can make actual payments and transactions. Click "Add" to set up payment methods, transaction fees, and maximum transaction fees

![](https://1012038583-files.gitbook.io/~/files/v0/b/gitbook-x-prod.appspot.com/o/spaces%2F6WUxwQSQcDz5p25hG7s0%2Fuploads%2FY0SfVtaLp2jzDM3di7ad%2F7.png?alt=media)

Click on "Resend Email" to resend the email. If the customer forgets their password, clicking on "Resend Email" will send the new password to the email address provided during registration

![](https://1012038583-files.gitbook.io/~/files/v0/b/gitbook-x-prod.appspot.com/o/spaces%2F6WUxwQSQcDz5p25hG7s0%2Fuploads%2Fu3KyC4wRgJp7MgHioSEY%2F8.png?alt=media)

Click to resend emai

![](https://1012038583-files.gitbook.io/~/files/v0/b/gitbook-x-prod.appspot.com/o/spaces%2F6WUxwQSQcDz5p25hG7s0%2Fuploads%2Fx3Xptob5LSQTe7sEKZrE%2F9.png?alt=media)

Will send the new password to the email address filled in during registration. Click on "Terminal Manage" to view the terminal information bound to the merchant, and you can edit the terminal type and delete the terminal

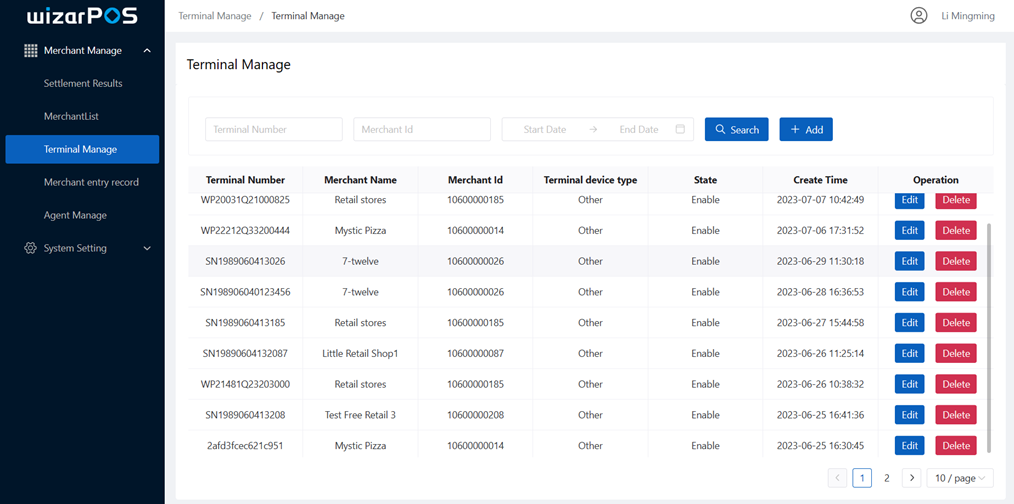
### 1.5 Merchant Management - Terminal Management <a href="#toc32108" id="toc32108"></a>

Clicking on Terminal Manage allows you to view terminal information for all merchants, and perform actions such as adding, editing, and deleting

![](https://1012038583-files.gitbook.io/~/files/v0/b/gitbook-x-prod.appspot.com/o/spaces%2F6WUxwQSQcDz5p25hG7s0%2Fuploads%2FX08iz7bT8yvC0Tqy7Ye7%2F10.png?alt=media)

Can edit terminal information

![](https://1012038583-files.gitbook.io/~/files/v0/b/gitbook-x-prod.appspot.com/o/spaces%2F6WUxwQSQcDz5p25hG7s0%2Fuploads%2FQFRniSQiuGvIkm3B0kPp%2F11.png?alt=media)

Clicking on "Add" allows you to add a new terminal for a specific merchant. The terminal can only be logged in and used after it is bound to the merchant

![](https://1012038583-files.gitbook.io/~/files/v0/b/gitbook-x-prod.appspot.com/o/spaces%2F6WUxwQSQcDz5p25hG7s0%2Fuploads%2FW1XgDEFAEq93PO6l5bNG%2F12.png?alt=media)

### 1.6 Agent Management

Clicking on the Agent Manage page displays agents. Agents are subordinates of service providers and can onboard merchants

![](https://1012038583-files.gitbook.io/~/files/v0/b/gitbook-x-prod.appspot.com/o/spaces%2F6WUxwQSQcDz5p25hG7s0%2Fuploads%2FwO16Km1EQC3oXLbGr3o2%2F13.png?alt=media)

Click Add to add an agent, fill in the information, click the confirm button, and the agent will be created. The initial password will be sent to the entered email

![](https://1012038583-files.gitbook.io/~/files/v0/b/gitbook-x-prod.appspot.com/o/spaces%2F6WUxwQSQcDz5p25hG7s0%2Fuploads%2F9m6VoqGIZenloZrETu3p%2F14.png?alt=media)

Clicking on Payment Setting allows you to configure payment settings

![](https://1012038583-files.gitbook.io/~/files/v0/b/gitbook-x-prod.appspot.com/o/spaces%2F6WUxwQSQcDz5p25hG7s0%2Fuploads%2F9K7I5pKWebIjbNFj27ky%2F15.png?alt=media)

You can configure the payment methods and commission rates for agents, with a maximum commission cap

![](https://1012038583-files.gitbook.io/~/files/v0/b/gitbook-x-prod.appspot.com/o/spaces%2F6WUxwQSQcDz5p25hG7s0%2Fuploads%2FCdcEie6NTbEPANIPqxfX%2F16.png?alt=media)

### 1.7 Payment methods

Click on Payment Method to view and create payment methods

![](https://1012038583-files.gitbook.io/~/files/v0/b/gitbook-x-prod.appspot.com/o/spaces%2F6WUxwQSQcDz5p25hG7s0%2Fuploads%2Fo87RvY1knPVOSuDEOiiP%2F17.png?alt=media)

Click on Edit to view detailed configuration methods

![](https://1012038583-files.gitbook.io/~/files/v0/b/gitbook-x-prod.appspot.com/o/spaces%2F6WUxwQSQcDz5p25hG7s0%2Fuploads%2Fki1cRFnnQbvxaPpGOBgC%2F18.png?alt=media)

Clicking on Add allows you to create a payment method

![](https://1012038583-files.gitbook.io/~/files/v0/b/gitbook-x-prod.appspot.com/o/spaces%2F6WUxwQSQcDz5p25hG7s0%2Fuploads%2FjED0QTNGkSbiBxIYR7QI%2F19.png?alt=media)

### 1.8 Service Fee

Clicking on Handing Fee Details will allow you to view a summary of the fees

![](https://1012038583-files.gitbook.io/~/files/v0/b/gitbook-x-prod.appspot.com/o/spaces%2F6WUxwQSQcDz5p25hG7s0%2Fuploads%2FZJ3MMxZ1GA7Jsegi1Srt%2F20.png?alt=media)

### 1.9 Service Fee Summary

Click Service Fee Summary

<figure><img src="https://1012038583-files.gitbook.io/~/files/v0/b/gitbook-x-prod.appspot.com/o/spaces%2F6WUxwQSQcDz5p25hG7s0%2Fuploads%2FOisERiS6ygLsDLMCy3d5%2Fimage.png?alt=media&#x26;token=9af22698-2b28-434b-ac9d-ae3da9d81def" alt=""><figcaption></figcaption></figure>

### 1.10 System Settings - Role Settings <a href="#toc21239" id="toc21239"></a>

Click on Role Manage to enter and view the currently available roles. Currently, there is only one type of role, which is the employee role, and it allows for menu authorization

<figure><img src="https://1012038583-files.gitbook.io/~/files/v0/b/gitbook-x-prod.appspot.com/o/spaces%2F6WUxwQSQcDz5p25hG7s0%2Fuploads%2FY4VViKXYLKc9bCJFUU6P%2Fimage.png?alt=media&#x26;token=4b36bcb1-bda5-498f-ba9a-19452d043324" alt=""><figcaption></figcaption></figure>

You can authorize the menu. Click on "Role resources" to edit the menu authorization. The checked menus will only be visible when logging into the system

<figure><img src="https://1012038583-files.gitbook.io/~/files/v0/b/gitbook-x-prod.appspot.com/o/spaces%2F6WUxwQSQcDz5p25hG7s0%2Fuploads%2FwhrPpbYSo39W2iPyUKp8%2Fimage.png?alt=media&#x26;token=912ea72a-c1f2-470c-babf-331f6bfe913f" alt=""><figcaption></figcaption></figure>

### 1.11 System Settings - User Management <a href="#toc13971" id="toc13971"></a>

Click on "User Manage" to enter user management. You can view all current account information, add new users, edit existing users, enable/disable accounts, and reset passwords

<figure><img src="https://1012038583-files.gitbook.io/~/files/v0/b/gitbook-x-prod.appspot.com/o/spaces%2F6WUxwQSQcDz5p25hG7s0%2Fuploads%2Ff1nLga0IHCy4UOShIn0r%2Fimage.png?alt=media&#x26;token=24baa51d-1134-4b5a-a619-e732a15c3dfe" alt=""><figcaption></figcaption></figure>

Click Add to create a new user

<figure><img src="https://1012038583-files.gitbook.io/~/files/v0/b/gitbook-x-prod.appspot.com/o/spaces%2F6WUxwQSQcDz5p25hG7s0%2Fuploads%2FmLciRUS4SUm5ntpINkya%2Fimage.png?alt=media&#x26;token=0d37e94e-c9fc-406c-8473-3e06f43effb1" alt=""><figcaption></figcaption></figure>

Click Edit to edit the user

<figure><img src="https://1012038583-files.gitbook.io/~/files/v0/b/gitbook-x-prod.appspot.com/o/spaces%2F6WUxwQSQcDz5p25hG7s0%2Fuploads%2FrrvhPljnRaxfzbdm1xti%2Fimage.png?alt=media&#x26;token=60c8430e-ff1b-41e9-a02c-0771b3396a87" alt=""><figcaption></figcaption></figure>

Click Disable or Enable to activate or deactivate the user

<figure><img src="https://1012038583-files.gitbook.io/~/files/v0/b/gitbook-x-prod.appspot.com/o/spaces%2F6WUxwQSQcDz5p25hG7s0%2Fuploads%2FrNsVZGVKeAZuXtBQlcSm%2Fimage.png?alt=media&#x26;token=f0c65508-1b7a-4898-b7c0-1dee74fab582" alt=""><figcaption></figcaption></figure>

Click on "Reset Password" to reset the user's login password

<figure><img src="https://1012038583-files.gitbook.io/~/files/v0/b/gitbook-x-prod.appspot.com/o/spaces%2F6WUxwQSQcDz5p25hG7s0%2Fuploads%2Fg1gyYidSvhEHCDswRzYY%2Fimage.png?alt=media&#x26;token=b35be808-14aa-45ef-8342-aaa0aafe2a7a" alt=""><figcaption></figcaption></figure>

### **1.12** Merchant Onboarding Announcement

Click on "Merchant entry notice" to view the merchant entry announcement. This page displays the information that users need to know when applying for the free version of the POS machine

<figure><img src="https://1012038583-files.gitbook.io/~/files/v0/b/gitbook-x-prod.appspot.com/o/spaces%2F6WUxwQSQcDz5p25hG7s0%2Fuploads%2FUFI1Kqcq14pY2PdhVZff%2Fimage.png?alt=media&#x26;token=caa84b8c-ffd8-4a52-abeb-2f990213912b" alt=""><figcaption></figcaption></figure>

### **1.13** Parameter Setting

Clicking on Parameter Setting allows you to replace the icon in the top left corner of the portal

<figure><img src="https://1012038583-files.gitbook.io/~/files/v0/b/gitbook-x-prod.appspot.com/o/spaces%2F6WUxwQSQcDz5p25hG7s0%2Fuploads%2FuIrGYCTbN0TKcVgavi7m%2Fimage.png?alt=media&#x26;token=778bc67b-bd4c-4f36-9d59-73ecd79e744a" alt=""><figcaption></figcaption></figure>

## 2  Operation and Maintenance Management Portal <a href="#toc183" id="toc183"></a>

### 2.1 Overview <a href="#toc7757" id="toc7757"></a>

Wizarpos operation and maintenance management portal is a backend system used by operation and maintenance personnel. It is mainly used to open service providers and then view all merchants under the service providers, as well as generated transaction data, order data, and member recharge and consumption data

### 2.2 Login <a href="#toc182" id="toc182"></a>

Enter your username and password on the login page, select the language, and log in to the system

<figure><img src="https://1012038583-files.gitbook.io/~/files/v0/b/gitbook-x-prod.appspot.com/o/spaces%2F6WUxwQSQcDz5p25hG7s0%2Fuploads%2FQeLmlE2UBvfDVFPipWpm%2Fimage.png?alt=media&#x26;token=58209906-48d8-4c90-8128-3802284c831c" alt=""><figcaption></figcaption></figure>

### 2.3 Data Overview <a href="#toc23150" id="toc23150"></a>

Login System After logging in, you will first enter the Dashboard page. Here, the data overview is displayed, showing the current number of merchants, number of members, daily transaction amount, and transaction amount chart data

<figure><img src="https://1012038583-files.gitbook.io/~/files/v0/b/gitbook-x-prod.appspot.com/o/spaces%2F6WUxwQSQcDz5p25hG7s0%2Fuploads%2FDsX4t4p8m9rwnA6vsxjq%2Fimage.png?alt=media&#x26;token=3b6d9c42-661c-4b2f-b0a5-369a565ac543" alt=""><figcaption></figcaption></figure>

You can view transaction data for merchants in the food and retail industry

<figure><img src="https://1012038583-files.gitbook.io/~/files/v0/b/gitbook-x-prod.appspot.com/o/spaces%2F6WUxwQSQcDz5p25hG7s0%2Fuploads%2FVqbZCB5pgkcPDYwOU8Cd%2Fimage.png?alt=media&#x26;token=adcb9881-64ce-4330-ae9f-4b927470aa24" alt=""><figcaption></figcaption></figure>

### 2.4 Service Provider Management <a href="#toc29471" id="toc29471"></a>

Click on Service Provider to enter the service provider list, where you can add, search, and modify service providers

<figure><img src="https://1012038583-files.gitbook.io/~/files/v0/b/gitbook-x-prod.appspot.com/o/spaces%2F6WUxwQSQcDz5p25hG7s0%2Fuploads%2F1bgYn2EMbT744kRK6DFp%2Fimage.png?alt=media&#x26;token=5c5e8126-8889-46cf-8c54-c15bcd275bdc" alt=""><figcaption></figcaption></figure>

Clicking on "Add" allows you to create a new service provider. After filling in the information, the service provider will be created. The email sent to the merchant when creating an account will be sent using the email provided by the service provider

<figure><img src="https://1012038583-files.gitbook.io/~/files/v0/b/gitbook-x-prod.appspot.com/o/spaces%2F6WUxwQSQcDz5p25hG7s0%2Fuploads%2F5lKfBAAw8EZ4IQ0kP6lD%2Fimage.png?alt=media&#x26;token=6069edfa-113a-4ced-b5ab-175553fea1bc" alt=""><figcaption></figcaption></figure>

<figure><img src="https://1012038583-files.gitbook.io/~/files/v0/b/gitbook-x-prod.appspot.com/o/spaces%2F6WUxwQSQcDz5p25hG7s0%2Fuploads%2FFo1ARvZLSPZfzsCULFgq%2Fimage.png?alt=media&#x26;token=af19b77e-fc22-418f-966a-f2e643c35ac1" alt=""><figcaption></figcaption></figure>

### 2.5 Role Management <a href="#toc32113" id="toc32113"></a>

Click on Role Manage to enter role management, which displays the current list of all roles. You can create and edit service providers, and authorize menus for service providers

<figure><img src="https://1012038583-files.gitbook.io/~/files/v0/b/gitbook-x-prod.appspot.com/o/spaces%2F6WUxwQSQcDz5p25hG7s0%2Fuploads%2FllACselcZkBEKvlI9HWj%2Fimage.png?alt=media&#x26;token=7e885c94-d714-47e6-9efd-89d972ea7ed9" alt=""><figcaption></figcaption></figure>

Clicking on Add allows you to create roles. There are three types of roles here, corresponding to different menu permissions.&#x20;

PTL-ADMIN is the merchant type, corresponding to the menu permissions of the retail and catering portals. Operations are used to set up retail and catering merchants, and determine which menus they can see

<figure><img src="https://1012038583-files.gitbook.io/~/files/v0/b/gitbook-x-prod.appspot.com/o/spaces%2F6WUxwQSQcDz5p25hG7s0%2Fuploads%2FZua8HSpPWs9Hxd3wQQh2%2Fimage.png?alt=media&#x26;token=63eb0b71-b582-4bd1-874b-09f94f036b06" alt=""><figcaption></figcaption></figure>

OPS-ADMIN is a service provider type, used for setting up which menus the service provider can see

<figure><img src="https://1012038583-files.gitbook.io/~/files/v0/b/gitbook-x-prod.appspot.com/o/spaces%2F6WUxwQSQcDz5p25hG7s0%2Fuploads%2FpZ7i64HOr2luTZaPdFeT%2Fimage.png?alt=media&#x26;token=df99734c-49e4-4b75-bcdc-add9ad9ecbc7" alt=""><figcaption></figcaption></figure>

SAAS-ADMIN is an operations and maintenance type used to set up which menus the operations and maintenance backend login account can see

<figure><img src="https://1012038583-files.gitbook.io/~/files/v0/b/gitbook-x-prod.appspot.com/o/spaces%2F6WUxwQSQcDz5p25hG7s0%2Fuploads%2F9NgF9lNq3bfe4youKfuU%2Fimage.png?alt=media&#x26;token=c9efcd11-37c2-4059-88de-09eeb2f44ca3" alt=""><figcaption></figcaption></figure>

### 2.6 Transaction Records <a href="#toc20347" id="toc20347"></a>

Click on Trans List, operations and maintenance administrators can view the transaction records of all merchants

<figure><img src="https://1012038583-files.gitbook.io/~/files/v0/b/gitbook-x-prod.appspot.com/o/spaces%2F6WUxwQSQcDz5p25hG7s0%2Fuploads%2FRPx3GZXuQMDgYGJIt8ur%2Fimage.png?alt=media&#x26;token=3cd5548d-4b54-465f-bd8e-41da2a441664" alt=""><figcaption></figcaption></figure>

### 2.7 Order Report <a href="#toc31697" id="toc31697"></a>

Clicking on "Order Report", the operations and maintenance administrator can view the number and amount of online and offline transactions generated by all merchants each day

<figure><img src="https://1012038583-files.gitbook.io/~/files/v0/b/gitbook-x-prod.appspot.com/o/spaces%2F6WUxwQSQcDz5p25hG7s0%2Fuploads%2FSXsP6CZigz6rwO5bk00I%2Fimage.png?alt=media&#x26;token=61d6e6dd-57c5-4e2d-922f-b5638c4941a8" alt=""><figcaption></figcaption></figure>

### 2.8 Membership Report <a href="#toc28449" id="toc28449"></a>

Clicking on the Membership Report, the operations and maintenance administrator can query all the members under all merchants, as well as the generated records of member recharge and consumption

<figure><img src="https://1012038583-files.gitbook.io/~/files/v0/b/gitbook-x-prod.appspot.com/o/spaces%2F6WUxwQSQcDz5p25hG7s0%2Fuploads%2F4LOrYbDrkfxrIcsaY4p1%2Fimage.png?alt=media&#x26;token=636fe162-ac50-4bc8-938d-e47caffe0aa2" alt=""><figcaption></figcaption></figure>

Click on Sales Report to view member consumption records

<figure><img src="https://1012038583-files.gitbook.io/~/files/v0/b/gitbook-x-prod.appspot.com/o/spaces%2F6WUxwQSQcDz5p25hG7s0%2Fuploads%2FAqYvjHvq7nvjinyK5vTX%2Fimage.png?alt=media&#x26;token=601c8e84-8027-443d-8fc2-c58f0a36d482" alt=""><figcaption></figcaption></figure>

## 3  Agent Portal

### 3.1 Overview

Wizarpos agent portal, mainly provides functions for agents to manage merchants. It allows agents to add and modify merchants under their agency. The merchant types supported are retail and catering. Agents can view transaction records of each merchant, as well as the terminal information and quantity bound to each merchant

### 3.2 Login

Enter the account password to log in to the backend. Before logging in, you can choose the language

<figure><img src="https://1012038583-files.gitbook.io/~/files/v0/b/gitbook-x-prod.appspot.com/o/spaces%2F6WUxwQSQcDz5p25hG7s0%2Fuploads%2FD76HTCyFlUStg5kNIOtq%2Fimage.png?alt=media&#x26;token=ef8f31f0-d729-4d56-8d52-7a99fe7ebfb7" alt=""><figcaption></figcaption></figure>

### 3.3 Merchant Management - Settlement Records

Click on Settlement Results to access the settlement records, where you can view all transaction data of merchant members and bank card transactions under this agent

<figure><img src="https://1012038583-files.gitbook.io/~/files/v0/b/gitbook-x-prod.appspot.com/o/spaces%2F6WUxwQSQcDz5p25hG7s0%2Fuploads%2Fq0KfjGkQl8YtCun4m1Xp%2Fimage.png?alt=media&#x26;token=3936b159-de77-4a9f-8165-f5763176e981" alt=""><figcaption></figcaption></figure>

### 3.4 Merchant Management - Merchant Information Management

Click on MerchantList to enter the merchant list, click on Add to add a new merchant (retail or catering), search and edit merchant information, resend emails, view bound terminals, enable/disable merchants, etc.

<figure><img src="https://1012038583-files.gitbook.io/~/files/v0/b/gitbook-x-prod.appspot.com/o/spaces%2F6WUxwQSQcDz5p25hG7s0%2Fuploads%2FF4pAxSdEAhIJs6Mf2MWP%2Fimage.png?alt=media&#x26;token=03162941-b479-4d89-98de-56667f145d8e" alt=""><figcaption></figcaption></figure>

Click on Add to fill in the merchant information and complete the account opening. The merchant will receive an account opening email and can log in to the merchant portal with the initial account and password to perform operations

<figure><img src="https://1012038583-files.gitbook.io/~/files/v0/b/gitbook-x-prod.appspot.com/o/spaces%2F6WUxwQSQcDz5p25hG7s0%2Fuploads%2FpC46yhpUDQBzAfiMZHaP%2Fimage.png?alt=media&#x26;token=30eeaa4e-2df9-4c66-ad0e-d1ee1e14b82f" alt=""><figcaption></figcaption></figure>

Click on "Resend Email" to resend the email. If the customer forgets their password, clicking on "Resend Email" will send the new password to the email address provided during registration

<figure><img src="https://1012038583-files.gitbook.io/~/files/v0/b/gitbook-x-prod.appspot.com/o/spaces%2F6WUxwQSQcDz5p25hG7s0%2Fuploads%2FinDq15ZhwGhT8kfx4CHq%2Fimage.png?alt=media&#x26;token=3b41f8cf-8b33-4ba6-bcbc-9683dca0463d" alt=""><figcaption></figcaption></figure>

Clicking on Terminal Manage allows you to view the terminal information bound to the merchant, and you can edit the terminal type and delete the terminal

<figure><img src="https://1012038583-files.gitbook.io/~/files/v0/b/gitbook-x-prod.appspot.com/o/spaces%2F6WUxwQSQcDz5p25hG7s0%2Fuploads%2FhXMMGsHQBHAJ1BwmYT8o%2Fimage.png?alt=media&#x26;token=8ed3a0d3-e590-46ca-a368-45c46132927c" alt=""><figcaption></figcaption></figure>

Click Disable to disable the merchant, click Enable to enable the merchant

<figure><img src="https://1012038583-files.gitbook.io/~/files/v0/b/gitbook-x-prod.appspot.com/o/spaces%2F6WUxwQSQcDz5p25hG7s0%2Fuploads%2F3n1E159HBFqHalBz5wG7%2Fimage.png?alt=media&#x26;token=5a03ca6b-88b0-4f1c-880e-6434a37525cf" alt=""><figcaption></figcaption></figure>

### 3.5 Merchant Management - Terminal Management

Clicking on "Add" allows you to add a new terminal for a specific merchant. The terminal can only be logged in and used after it is bound to the merchant

<figure><img src="https://1012038583-files.gitbook.io/~/files/v0/b/gitbook-x-prod.appspot.com/o/spaces%2F6WUxwQSQcDz5p25hG7s0%2Fuploads%2FGKhhdZxfvNLZya0U9hws%2Fimage.png?alt=media&#x26;token=f0824b8d-85b3-4fe8-b46d-ebc012902e55" alt=""><figcaption></figcaption></figure>

### 3.6 System Settings - User Management

Click on "User Manage" to enter user management. You can view all current account information, add new users, edit existing users, enable/disable accounts, and reset passwords

<figure><img src="https://1012038583-files.gitbook.io/~/files/v0/b/gitbook-x-prod.appspot.com/o/spaces%2F6WUxwQSQcDz5p25hG7s0%2Fuploads%2FT55vReIQs6d4wEDGPJq1%2Fimage.png?alt=media&#x26;token=093fc982-f9cd-4106-ad8c-52dca8dc90fc" alt=""><figcaption></figcaption></figure>

Click Add to add a new user

<figure><img src="https://1012038583-files.gitbook.io/~/files/v0/b/gitbook-x-prod.appspot.com/o/spaces%2F6WUxwQSQcDz5p25hG7s0%2Fuploads%2FYSnefpCrCaDEAAlcykbU%2Fimage.png?alt=media&#x26;token=b116323c-3ec7-4235-b987-29768d2c091b" alt=""><figcaption></figcaption></figure>

Click Disable or Enable to activate or deactivate the user

<figure><img src="https://1012038583-files.gitbook.io/~/files/v0/b/gitbook-x-prod.appspot.com/o/spaces%2F6WUxwQSQcDz5p25hG7s0%2Fuploads%2FBaljjkPhTE13L3CIvpFs%2Fimage.png?alt=media&#x26;token=32324ebf-0697-4164-9dfb-9a679f3d30b7" alt=""><figcaption></figcaption></figure>

Click on Reset Password to reset the user's login password

<figure><img src="https://1012038583-files.gitbook.io/~/files/v0/b/gitbook-x-prod.appspot.com/o/spaces%2F6WUxwQSQcDz5p25hG7s0%2Fuploads%2FidfxpGYZDsU2ntaDTbAE%2Fimage.png?alt=media&#x26;token=8993550b-35ec-4bce-8cbb-b51da4dad653" alt=""><figcaption></figcaption></figure>


---

# Agent Instructions: Querying This Documentation

If you need additional information that is not directly available in this page, you can query the documentation dynamically by asking a question.

Perform an HTTP GET request on the current page URL with the `ask` query parameter:

```
GET https://smartpossdk.gitbook.io/wizarpos-catering-and-retail-soloution-user-guide/product-user-guides/management/manual-for-maintenance-management-portal.md?ask=<question>
```

The question should be specific, self-contained, and written in natural language.
The response will contain a direct answer to the question and relevant excerpts and sources from the documentation.

Use this mechanism when the answer is not explicitly present in the current page, you need clarification or additional context, or you want to retrieve related documentation sections.
